
 Back
view
Back
view
Front view
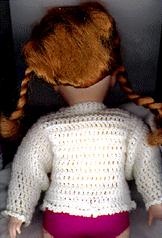
Back
view
Spring Sweater for 18 inch doll
This pattern is made with baby yarn, and uses basic stitches. Since less than 1 ounce is used, it is a great way to use up scraps from several skeins.
Materials:
E- Hook
Baby weight Yarn (sport weight can be substituted)
Stitches used special stitches are "clickable" for a photo representation of the stitch.
Note: for international crocheters, these patterns use the U.S. terminology
Slip Stitch (sl st), Single Crochet (sc), Half-Double Crochet (hdc), Double Crochet (dc), Double Crochet Increase (dec inc.), Double Crochet Decrease (dc dec).
Sweater Pattern
Sleeves (make 2)
Leaving long tail for attaching later, ch 30, join to form circle being careful not to twist chain
Row 1: Ch 3, turn (counts as first dc now and throughout); dc in each st around, join (30 sts)
Rows 2-5: Ch 3, dc in each st around, join (30 sts)
Row 6: Ch 3, dc dec, (dc next st, dc dec) around, join (20 sts)
Rows 7 & 8: Rep Row 2.
Row 9: ch 3, dc in next, dc dec, (dc in next 2 sts, dc dec) around, join (15 sts)
Row 10 & 11: Rep Row 2.
Row 12 (edging): Working this row in front loops only -- (ch 3, sl st in next st) around, join. Fasten off.
![]()
Body of sweater:
Beginning at waistline, ch 52.
Row 1: Dc in 4th ch from hook, dc in each ch across. Do not join. (50 sts)
Row 2 -5: Ch 3, turn (counts as 1st dc throughout); dc in each st across (50 sts) do not fasten off.
![]()
Right Front
Row 1: ch 3, turn; dc in next 10 sts, dc dec, leave other sts unworked. Mark this row as right side
Row 2: ch 3, turn; dc dec, dc in next 9 sts. (11 sts)
Rows 3-6: Ch 3 turn; dc in each st across (11 sts)
Rows 7: Ch 3 turn; (dc dec) twice, dc in next 6 (9 sts)
Row 8: Ch 3, turn; dc in next 4, (dc dec) twice. (7 sts)
Row 9: Ch 3, turn; dc dec, dc in next 4 sts. (6 sts) Fasten Off. Leave long tail for sewing shoulder seam later.
![]()
Left Front
With the Wrong Side facing, join yarn with sl st to top of Row 5 Turning ch of Sweater Body
Work as for Right Front, leave long tail on last row for sewing shoulder seam later.
![]()
Back of Sweater
Working in unused stitches of Body Row 5, Right side facing. Join to next st with sl st.
Row 1: ch 3; dc in next 22 sts. {23 sts=22 dcs + ch-3}
Row 2: Ch 3, turn; dc dec, dc in next 18 sts, dc dec. (21 sts)
Row 3 - 8: Ch 3, turn; dc in each st across. (21 sts)
Row 9: Ch 3, turn; dc in next 5, hdc in next st, sc in next 7, hdc in next st, dc in next 6 sts. (21 sts)
Row 10: Ch 3, turn; dc in next 5 sts, hdc in next, sc in next st, sl st in next 5 sts, sc in next st, hdc in next st, dc in next 6 sts. (21 sts)
![]()
With right sides together, sew the shoulder seams through inside loops only.
![]()
Sweater Edging
With right side facing, work in remaining loops of foundation ch, join with sc in center back.
Row 1: Sc in next 25 sts, ch 1, sc in same st; Working up Right Front, work 2 sc in end of each row; sc in each st across neck; Working down Left Front, work 2 sc in end of each row; sc in bottom of turning ch of foundation ch, ch 1, sc in same st; sc in each remaining st of foundation ch, join.
Row 2: Working in Back loop only, (ch 3, sl st) in each st around to neck, sc in last 4 sc of Right Front, across Neckline, and first 4 sts of Left Front, (ch 3, sl st) around, join. Fasten off.
![]()
Finishing Off
Attaching Sleeves: With right sides together, and seam of sleeves facing down, sew in sleeves easing in excess of arm hole to sleeve.
Sew in yarn ends.