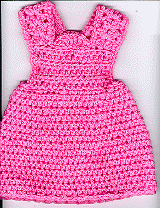
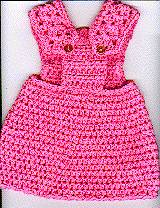
 Back view
Jumper, for 18" doll
Front View Back view
Materials needed:
Worsted Weight Yarn, 3 ½ oz. (I used Wintuk "Pretty Pink" #3079)
"G" Hook
2 Buttons, sewing thread of matching color
Difficulty level: I would rate this pattern intermediate, because of pattern instructions, but an advanced beginner will find the Jumper itself very easy.
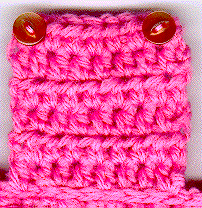
Stitches Used: Sl st, sc, hdc, dc, tr. Special sts: Shell st, modified fan st, sc dec.
Special Stitches: Click on Special st to see close up on skirt photo
Shell Stitch: ch 3, turn, (2 dc, ch1, 2 dc) in center st, dc in last st.
Modified Fan Stitch: (3 tr in next st) twice.
Sc dec: insert hook in next st, YO, pull loop through st (2 loops on hook), insert hook in next st, YO, pull loop through st (3 loops on hook), YO, draw through all three loops on hook. Sc dec made.
Skirt
Begins at waistband, do not turn after each row, join at end of each row unless otherwise stated.
Ch 50, join to form circle being careful not to twist ch.
Row 1: ch 2 (counts as hdc now and throughout) , hdc in each ch, join { 50 hdc}
Row 2 and 3: Ch 2, hdc in each st around.
Row 4: ch 2, hdc in next 8 sts, 2 hdc in next st, (hdc in next 9 sts, 2 hdc in next st) around { 55 hdc}
Row 5: Repeat row 3
Row 6: ch 2, hdc in next 9 sts, 2 hdc in next st, (hdc in next 10 sts, 2 hdc in next st)
around {60 hdc}
Row 7: Repeat Row 3
Row 8: Repeat Row 4 {66 hdc}
Row 9 – 15: Repeat Row 3.
Row 16 (edging): ch 2, (sl st in next st, hdc in next st) around. Join to top of ch-2. Fasten off.
Front Bib
Begin by working across opposite side of beginning chain of skirt;
Row 1: Join with sc in 20th chain from back seam, sc in next 2 chs, sc dec, (sc in next 3 chs, sc dec) around { 40 sc}
Row 2: Ch 2 (counts as hdc through out), turn, hdc in next 14 scs, leave rest un-worked. {15 hdc}
Rows 3 – 7: Ch 2, turn, hdc in each st across. Do NOT fasten off, do not turn.
Straps
Left strap
Row 1: sl st in first st, (2 dc, ch 1, 2 dc) in next st, sl st in next st.
Rows 2 – 8: work Shell Pattern.
Row 9: Ch 1, sc in next 3 sts, ch 3, skip ch-1 of shell, sc in next 3 sts.
Edging: Ch 1, sc along side of strap in end of rows, work 2 sc per row.
Top of Bib: Working across top of bib, sc in next st, skip 2 sts, work Modified Fan Stitch, skip 2 sts, sc in next st. Do NOT fasten off, Do not turn.
Right Strap:
Row 1: Sl st in next st, (2 dc, ch 1, 2 dc) in next st, sl st in next st. {first shell made}
Rows 2 – 8: Work Shell Pattern.
Edging: Work inside edging as for Left strap. Fasten off.
NOTE: Button hole on top will be worked later after Back Bib is made.
Back Bib
Join with sl st at (Back Seam – 2 sts)* See Photo for placement.
Row 1: ch 2, hdc in same st, hdc in next 7 sts {9 hdc}
Row 2 – 6: Ch 2, turn. Hdc in each st across. {9 hdc} Fasten Off.
Edging of Jumper
Join with sl st to top inner corner of Right Strap, and work across top of shell.
Button Hole: sc in next 3 sts, ch 2, skip ch-1 of shell, sc in next 3 sts. Do NOT turn.
Begin working down outside of strap: Ch 1, sc in same space, sc in end of each row working 2 sc per row; work sl st across waist band, up sides and top of Back Bib, and other side of waist band. Sc up outside edge of Left Strap working 2 sc in end of each row; Ch 1, join to first sc of Row 9 of Left Strap. Fasten Off.
Finishing Touches:
 Sew two buttons with sewing
thread of matching color to upper corners of Back Bib.
Sew two buttons with sewing
thread of matching color to upper corners of Back Bib.
Using large eyed needle to sew in ends of yarn.
ÓCopyright 1998 Margaret Hovey